Showing posts with label Shabby Chic. Show all posts

Saturday, March 02, 2013

Mantelpiece love - Cheap decorating

Hey all,
Hope you are all well and staying dry in whatever part of the world you're in.
I seriously think I need to start building an Ark...this rain is just relentless!!

First of all...I'd like to announce the winner of the lucky lady that left a comment on my Scrap FX Blog Hop post...it is....

LAUREN!!

 So Lauren...if you could please email me at tisher_6@hotmail.com(no au) I will pop your prize in the mail ASAP.

I haven't drawn the lucky winner of my February competition I had running yet but that will be in my next post...so stay tuned.

Today I just want to share another happy spot I have in our house that I just love looking at...that cost me next to nothing to dress up.
It's our mantelpiece above the fireplace.


It's one of the focal points in our lounge room so I wanted to dress it up a bit...on a budget.
If you recall my last post...I upcycled the gorgeous old vintage clock which takes pride of place on the top shelf of the mantelpiece along with a wooden FAMILY sign and my collection of T's (the initial of our surname).

The bottom shelf however posed a little bit more of a problem as everytime I put something there my husband would deem it a fire hazard. I really wanted something pretty and something to fit into the FAMILY theme I have going on there when I came across the black frames you see. 
They were a set of 6 and the patterned paper you see in them was already there. So...instead of putting photos in them I simply put black vinyl Thickers in them to spell out the word FAMILY. 
Too easy! 
The set of frames cost me $5- from a discount store and I already had the letters at home but they cost around $5-6 dollars a packet so not a budget breaker.

I'm also a hopeless collector of vintage doilies and have an absolute barrel full. I'm always looking out for things to make with them so made this cute doily and burlap Shabby Chic banner to hang on the mantelpiece.

I love how this all looks now that I've hung the Home Sweet Home frame above it all:

The white really brightens up the dark wall beautifully.

So...here's another budget 'brighten up a corner in your house' idea for you.
Sew up some cute banners, upcycle something vintage and hunt around for some sweet little frames to play with.
It really doesn't have to cost a fortune to make your house a home.

Until next time,
Sharryn
xx

Wednesday, February 13, 2013

Instant Love

Hi all,
I have a layout to share today that is very special to me.
These photos were taken by my son just after my grandson was born.
My first cuddle, my first kiss.
Words cannot express how proud I was and how I instantly fell in love with this tiny little baby boy.

I wanted a fresh but boyish colour scheme to scrap these flowers to represent him being a brand new newborn. The lime green, turquoise and splashes of brown were perfect for teaming with white for the soft, fresh look I was after.


I used Gesso and white ink on all my Scrap FX chipboard pieces and distressed the patterned papers and white cardstock background for added texture. I also used a scallop punch on the leftover white cardstock to tuck under the distressed cardstock border. I love this look.

Check out this awesome Scrap FX light bulb that I've layered over my title...isn't it just gorgeous?

Want to see more? Simply head over to the Scrap FX blog. Be sure to check out the 2013 Design Team call while you're there!

Chat soon,
Sharryn

Friday, November 02, 2012

Upcycling Wood Into Home Decor

Hey all,
Thank God it's Friday! What do you have planned for the weekend? I have photo shoots booked both Saturday and Sunday but I'm hoping to get some more refurbishing and upcycling done on some awesome pieces I picked up at a garage sale last weekend.

Today I want to show you how I've dressed up a corner of our dining room Shabby Chic style with just a piece of wood and an old dresser/sideboard.

While having a coffee out our backyard the other day I found this piece of wood laying on a pile ready for the firewood box. Instant love! I could see a lot of potential in this piece...can you?

Already mid project with an old dresser Michael had bought home years ago...


...I thought this would be the perfect piece to finish off the corner of the dining room I was working on and hang above this dresser.
So...out came the trusty white paint and brushes and of course...the sandpaper.

The wood had a beautiful, natural texture that I wanted to keep so I didn't sand it back to start with. I also left the nails as they were to use as hooks when the piece was finished so I can hang little pretties from them.
Once I painted it with two coats I sanded it back to reveal the nails and some of the natural grain.

I've been playing around with a fabulous new technique I've learnt making pieces of wood into great, vintage and Shabby Chic home decor. It's so, so easy and looks great!
I've already show you something I've made with this technique but didn't tell you how to do it. Remember this?

I made this from a scrap piece of wood for my laundry using the exact same technique!

YOU'LL NEED:
A piece of scrap wood
White paint (it should work on other light coloured paint as well)
A printer and printer paper
A rub-on tool or a paddle pop stick
Sticky tape

HOW TO:
Step 1: Paint your piece of wood and set it aside to dry.
Step 2: Choose the graphic on your computer you'd like to transfer to your wood.
Step 3: Open your graphic in a photo editing program and REVERSE the image. Make sure your printer is set to print in BLACK. Print your image on to normal printer paper.
Step 4: Carefully (and I mean CAREFULLY) place your graphic face down on your piece of wood. Once you're happy with the placement adhere the paper to the wood with sticky tape.
TIP: The ink will smudge if you move it around too much so be gentle!!
Step 5: Gently rub over the graphic with a rub on tool or a paddle pop...something with a flat edge, not sharp. This will release the ink from the paper to the piece of wood. Go over the whole image thoroughly until you are happy with the look.
Step 6: OPTIONAL - If you would like your transferred graphic to be a little darker you can carefully go over the graphic with a Sharpie pen as I have done with the Laundry sign. For a softer, more vintage look leave it as it is.

You're only limited to your own imagination using this technique. I've almost finished refurbishing a beautiful old dresser with some gorgeous graphics that I can't wait to share with you.
But for now...back to the old piece of wood I found out the back!

Using the above technique I transferred the word LOVE to a bottom panel of the wood. I left this untouched as I was after the softer, vintage look.

As the piece I found has an awesome centrepiece hole I wanted to make something sweet to sit in there. I've always got a million and one photo frames lying around so I grabbed a wooden one and gave it the same treatment as the wood, a lick of paint and a sand. I grabbed some black cardstock and wrote the word LIVE on it and framed it. Simple...but very sweet.
TIP: No need for messy blackboard paint for small projects like this...simply use black cardstock and a white crayon. It gives exactly the same effect and is MUCH cheaper!

I also have a million and one crocheted doilies in my craft stash so to finish the piece off I made a gorgeous doily bunting to hang from the bottom and a cute hessian bunting (that I made from an old hessian sack) to hang from the top.

I had two sweet little wooden birds I'd bought from a shop ages ago so I hung these from the bottom of the piece from nails that were there originally.

So now I have a gorgeous piece of shabby Chic wall art to hang above my refurbished dresser:


Now...the dresser. Apart from the handle being broke this was in great condition. So all I wanted to do was give it a paint and sand it back. I painted it a very light shade of green and sanded it quite heavily:

I'm on the look out for more pretties to sit on the shelves...who knows what I'll find :)
I've managed to brighten up a corner of our dining room for next to nothing.


COST
Dresser - FREE
Wooden piece - FREE
Paint - Had on hand
Doily bunting - Made from items in my craft stash
Hessian bunting - Made from old sack my husband had

Have a look around your house, yard and husbands garage...you never know what you might find.

Hope you have a great weekend.
Sharryn
xx

Monday, October 29, 2012

Brighten up a Patio Corner

Hi all,
Hope you enjoyed the Shabby Chic chair tutorial. Today I'm going to show you how to brighten up a corner of your patio on a budget.

First of all though, what do you think of my blog overhaul? Looks great doesn't it?
Massive thanks go to Lisa Warren who has her own Blog and Digital Design service so if you're blog is looking a little tired or outdated, be sure to contact Lisa for a whole new fresh and funky blog overhaul.

This is a project I've shown briefly before but again, I had a few emails from people wanting to know how to do it so this post will be a run down on how it was done.

This house had a whole new verandah built on the front and while settling in I just put my pots, tables and chairs out there without a second glance.
Walking in the front gate one day I thought how plain it looked and decided to make myself a pretty little corner I can sit in and relax with a good book.

YOU WILL NEED:
A table (and chair if you like)
White paint
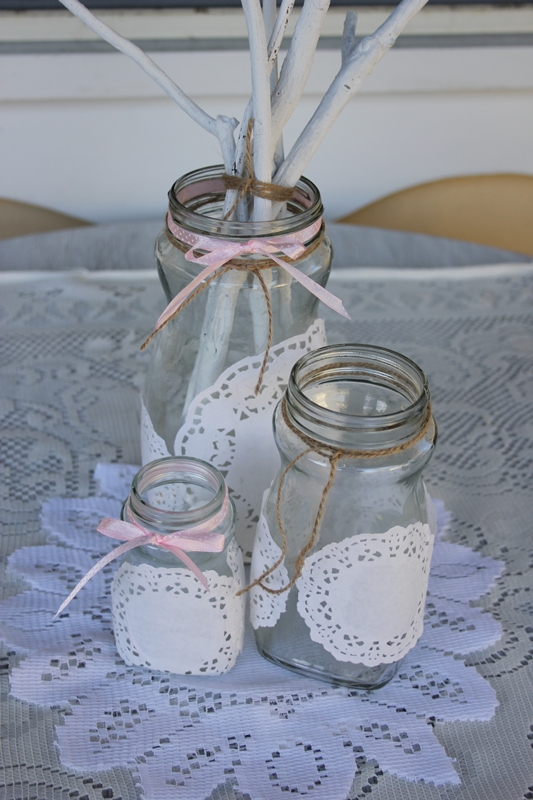
Glass coffee jars
Paper Doilies
Clear glue
Long sturdy sticks


This is what I started with:

Drab hey?
I hit the table first with a sanding down then followed it by a whitewash of paint. Once dry I gave it a good sanding again to distress it evenly. That's ALL I did with the table.

Now for the pretties...I've been collecting old coffee jars just with this idea in mind so luckily I had them on hand and ready to go.
If you haven't already got some then GET SOME! Simply soak them in warm, soapy water and you'll find the labels will come off quite easily.

I used small paper doilies to funk up my coffee jars. These were positioned randomly on the jar and when I was satisfied with their placement I simply pasted the back of the doilies to the jar.
TIP: Use a clear drying glue for this step as it does get a little messy.

Set them aside to dry then embellish the tops with pretty ribbons and twine or whatever else takes your fancy.
TIP: These jars are also a fabulous way to present gifts. Simply keep the lid and decorate it and fill the jar with lollies, preserves, buttons or anything really.


Now...off we go for a walk. Yes..that's right! You can stay fit and craft at the same time!!
Collect some sticks from either your garden, surrounding bush or parks or pinch them from your neighbours yard.
Make sure you're sticks are sturdy and not too thin or they will break easy. So we're after STICKS not TWIGS!!

Once you're happy with your collection give them a slap of white paint. When they are dry tie some twine around the bottom to form a bunch and put them in your largest jar.
You could make some cute little paper embellishments such as birds or butterflies to hang from your sticks however mine are in a high wind area so I skipped that step for now.


Find a pretty tablecloth and doily to sit on your table and voila! You now have a sweet little spot on your patio to sit and enjoy the view.


 COST:
Table - given to me
Paint - had on hand
Coffee jars - had on hand
Paper Doilies - had on hand
Sticks - found objects
Glue - had on hand

ALL UP:
This cost me nothing to refurbish/upcycle bar time.

TIME TO MAKE:
Half a day

Enjoy,
Sharryn xx

Friday, October 26, 2012

Refurbishing and Upcycling

Well well...two blog posts in one day (well that's if I'm quick...it's almost Midnight here)
To be honest I've spent hours this afternoon fiddling around with my blog trying to figure something out and thanks to the help of the lovely Lisa Warren I think I've accomplished what I started out doing.

In the past few months I've spent quite a lot of time refurbishing and upcycling. Not only furniture...but whatever I can get my hands on. I've already shown a few projects but didn't really go into how they were done. I've had quite a few emails about these projects so I thought why not share how I've refurbished/upcycled them? Most of them are easy peasy and really do make a difference...even if it's just a coat of paint.

I'll also be adding some category links to my sidebar to make it easier for you to get around my blog a lot quicker rather than having to scroll through a million and one posts to find something. (Thanks again Lisa!)

So...the first few refurbishing and upcycling posts will be things I've already shared so I apologise for you having to go over them however this time I'll be sharing how I made them. So you never know...you might just learn a thing or two to tackle on your next home project. I'm sure you'll be happy to know that most of these projects are made with a strict budget in mind.

The first thing I'm going to share with you is the Shabby Chic dining chair I refurbished. Here is a Before and After shot followed by a list of what you'll need.

YOU'LL NEED:
An old wooden chair (I bought this chair from an Op Shop for $1-!! Yep...1 buckaroo!!)
White paint (enough to paint chair with 2 coats)
Pastel Pink paint (enough to add stencil work)
1 x large square paper doily
3 x small round paper doilies
Sandpaper
Blu Tac or double sided tape
Foam brush
Paint brush/es
 
SO LETS GET STARTED

STEP 1: I started by giving the chair a good clean then a light sand. As it was quite old it didn't have much lacquer left on it anyway.

I then gave it a light coat of white paint. (The paint I used was a huge tin my husband had given to him last year so no cost there). After the first coat dried I gave it another light sand then another coat of paint and let that dry again.

OK...so now we have a nicely painted chair and of course you could finish right here ...but where would the fun be in that?

STEP 2: Once I had my two coats of paint on I attacked the chair with my sandpaper.
TIP: Be sure not to over distress the seat or back of the chair where the doilies will be stencilled on later.
For the rest though, don't be shy at this stage...get in there and have a go! Remember...it's only wood you're not going to hurt it. The whole idea of Shabby Chic is DISTRESS, DISTRESS, DISTRESS...that's the chair...not you :)
Once you're happy with you're distressing and you think the chair has had enough set your sandpaper aside for a while.

STEP 3: Grab your large paper doily and your adhesive and let's get on to the next step.
Position your large paper doily on the seat of the chair so it's sits nicely in the middle. Once you're happy with the placement of the doily attach it to the chair with your adhesive.

With your pink paint and foam brush lightly paint over the doily CAREFULLY so as not to rip it.
TIP: Use less rather than more paint for this step and build up colour as you go. Too much paint will make the fragile paper doily to wet resulting in unwanted tears and rips.
Once you have finished set your chair aside until your stencilling paint is dry.

STEP 4: Dry? Now we are ready to CAREFULLY remove the paper doily from the chair. REMEMBER that the chair might be dry but the paper doily may still have globs of wet paint on it so be careful at this step.
TIP: Depending on what sort of adhesive you've used some of the paper doily may stick to the chair. Don't panic! Just remove what you can in large pieces then go back over it until you've got it all off.
If there is any residue from the paper doily simply sand it very lightly with the sandpaper and you'll find it comes off quite easily.

Once you've finished this step and you are SURE the stencilling is dry you can proceed to sand the seat as much or as little as you like. You should end up with something like this:

Pretty right?

STEP 5: Now you'll need to grab your 3 smaller paper doilies and following the above steps position them on the back of the chair ensuring the middle one is centre. Again, once you're happy with your placement adhere them and paint over them with the pink paint and foam brush.
TIP: Keep in mind the smaller doilies will be a little more finicky to paint over so be sure not to load your brush too much.
Once dry remember the steps above and remove your paper doilies.

So the back of your chair should look like this:


Sand around and inside your stencilled circles as much or as little as you like.

Add a pretty cushion, grab a cuppa and a good book and sit under a tree and relax after all your hard work.


COST:
Chair - $1-
Paper doilies x 4 - approx. $1-50
White paint - free
Pink paint - approx. $2-50
ALL UP - This chair cost me approx. $5-

TIME TO MAKE:
This is easily a one day project.

Until next post...stay safe and don't forget to look for bargains!
Sharryn
xx


Related Posts Plugin for WordPress, Blogger...